Thursday, April 30, 2020

SAAS Web Application Development Principles To Be Followed In 2020


If you’re reading this article, it probably means that you aren’t satisfied with the progress of your web development project. More often than not, it means something went wrong during the development cycle.
It could have been a problem with delivery, scalability, or cost estimation. Regardless, whether it’s a new build or an implementation of new features, it can quickly become overwhelming.
So what’s a product owner to do?
Those product owners I was consulting with, react in different ways. But most often, they tend to put all other business activities on hold to dive deep into managing the development process.
The process of developing sophisticated web-based software is more like a marathon than a sprint. But we have to keep moving forward. To avoid potential problems, follow the best practices introduced in this guide. The following recommendations are based on The Twelve-Factor App methodology.
The web application development best practices discussed here can be applied to any Software-as-a-Service (SaaS) model. It covers everything from back-end development on a local machine to cloud architecture.
They are also based on the contributions of a broader community of software engineers who boast significant expertise in enterprise web development.

Technology choice: Symfony PHP framework

This journey into web application development best practices can be used as a guide to designing back-end architecture, and more. You can also do this by using any programming language you like.
However, for this post, we will focus on examples that leverage the Symfony PHP framework. It makes perfect sense as this framework is often used to build mid-sized cloud-based SaaS products.
According to the Roadmap, Symfony has continued to evolve since it was first released in 2005. Today, the framework follows PHP Standards Recommendations and boasts SOLID design principles for web development. So software engineers will be able to follow these best practices, seamlessly.

Principle 1: One codebase can accommodate multiple deployments during the web development cycle

If you’re designing a web application and not a distributed software, I strongly recommend sticking to a single codebase. The best way to go about it is to store your code in a Git repository (or any other version controlled solution).

WEB APPLICATION DEVELOPMENT CYCLE FOR THE NEW FEATURES WILL LOOK (MORE OR LESS) LIKE THIS:

  • Software engineers work with the same codebase on their local computers.
  • After each feature is developed, they’ll push the code to a Git repository.
  • The updated codebase is then deployed and tested on a staging server by the Quality Assurance team.
  • The same code is then deployed to production, but only after it’s tested on a staging level to ensure that it works as intended.

Principle 2: Explicitly declare and isolate dependencies for the software

The golden rule is to first make a list of all external libraries and services that have been used. These should be separate from the code and quickly switched on/off or changed as needed. This enables you to do more with minimum influence on the overall code.
To manage libraries, for example, use a Composer. It’s a great way to add and manage libraries demanded by your web application.
The Composer will create a file called composer.lock. Here, you’ll find the same (exact) version of each package downloaded. These are the same packages that ran during the composer installation.
Store composer.lock in your Git repository and exclude the vendor folder from Git. This approach will ensure that each deployment (for another developer, for staging, or production servers) will get the same versions of libraries after the run “composer install” command.
If you fail to do this, you may end up with different package versions on production that will result in unstable app behavior.
Check our case study about moving a Web product from monolith to microservices architecture and reducing dependencies to a minimum.

Principle 3: Separate configuration files and application code base

According to the Twelve-Factor App principles, “an app’s configuration is everything likely to vary between deploys.”
Often, software configuration settings can be changed between development, staging, and production environments. However, according to the application development principals, storing them in the codebase as configs or constants is prohibited.

THE FOLLOWING ARE EXAMPLES OF SETTINGS THAT SHOULDN’T BE STORED WITHIN THE CODE:

  • Database and cache server connection settings
  • Credentials to third-party services
  • APIs and payment gateways
  • Everything that changes depending on the deployment stage
Not following these web development principles may lead to scenarios where your app works perfectly on the developer’s machine and at the QA stage, but not when it’s deployed to production. Typically, something always breaks because of the changes made to the configuration in the code.
However, Symfony web development uses DotEnv library to work with environment variables. Here’s an example of different environment variables for development, staging, and production.
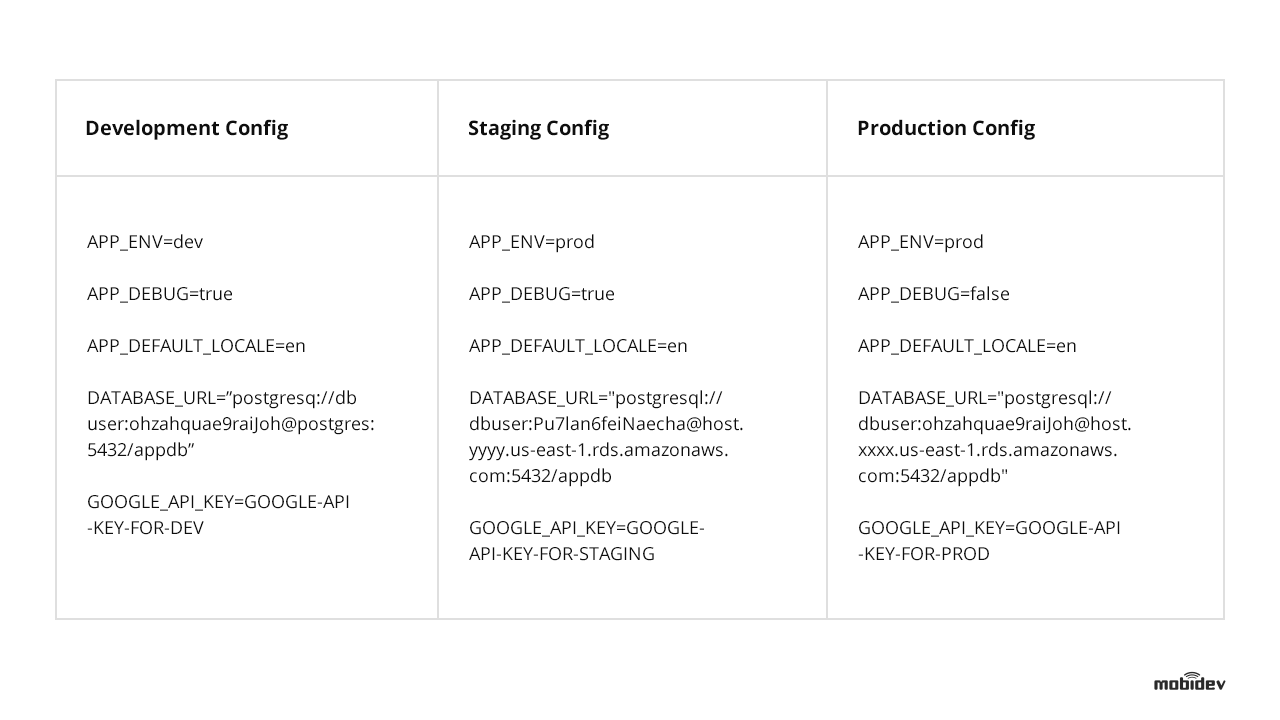
Examples of different environments for web app development
So it doesn’t matter where the web app is deployed because there won’t be any need to change the code. Only proper environment variables have to be set. If you’re using Docker, run different Docker containers from the same image with different environment variables for different deploys.

Principle 4: All the variety of services your web app runs, have to stay detached

The software community verdict is clear. It doesn’t matter if the application uses some third-party back-end services, APIs, or built-in components like a MySQL database. The best practice in this scenario will be to treat them all as attached resources.
Enable software access via a URL or use any of the other methods stored in the configuration. This approach will allow the development team to manage components without making changes to the code.
Symfony development is all about following SOLID principles. For example, to change database storage from MySQL hosted on EC2 instance to Amazon RDS, you just need to change the DSN style URL in the environment configuration without making any changes to the code.
You can even change static storage from Amazon S3 to any other Cloud Storage just by changing the environment variables, without changing the code.
Some libraries support various types of storage with an implemented abstraction layer. Flysystem, for example, supports different types of cloud storage. Doctrine is another example, but it’s abstracted around database storage. So you can switch from MySQL to PostgreSQL after making minor changes to the code.

Principle 5: Build, release, and run each software development stage separately

To ensure stability during all stages of the build, you can leverage automation tools like Gitlab CI and Jenkins.
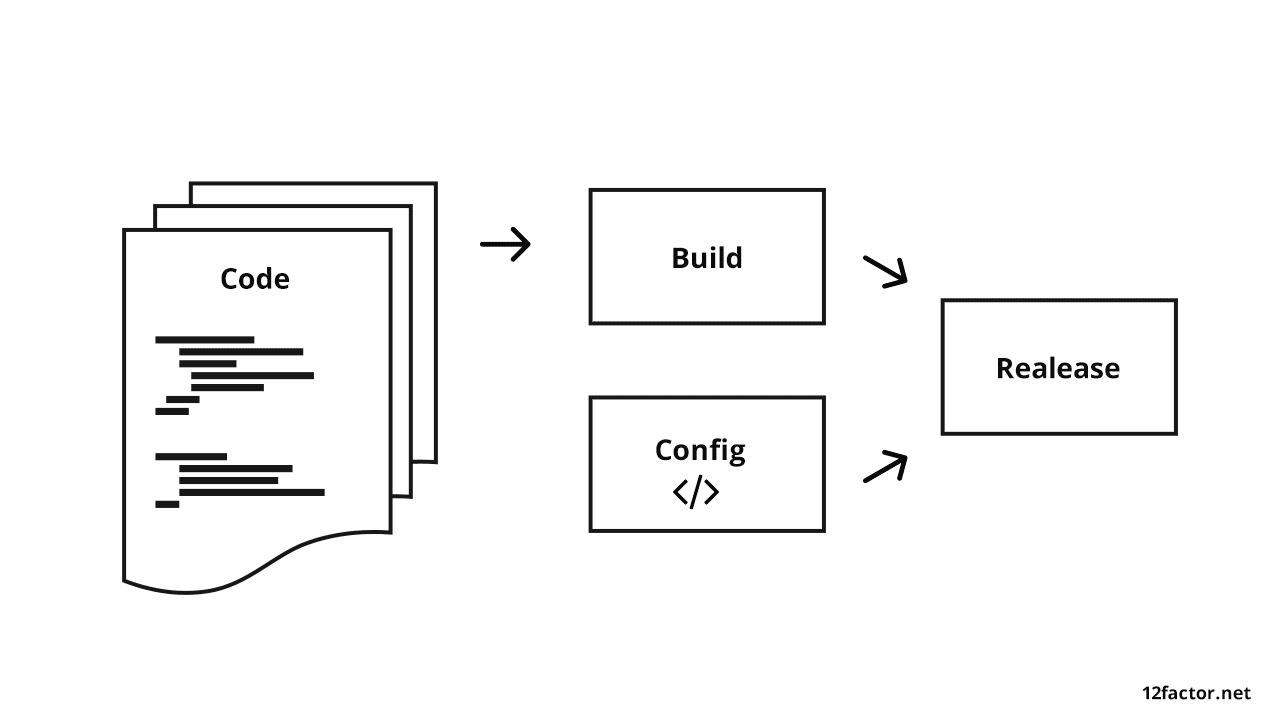
Best practice is to separate staging while app development

SOFTWARE DEVELOPMENT PIPELINE STAGES:

During the build stage – the code must be set, depending on the PHP libraries and CSS/JS assets that need to be prepared. Finally, the Docker container with a version tag has to be built and pushed into the Docker registry. You’ll also have the option of executing unit tests and code sniffer.
At the release stage – combine the Docker container (produced during the build stage) with the configuration for the environment (staging, and/or production) where you will run your build.
At the run stage – execute the app in the selected environment with proper environment configuration. This will be based on the release stage.

Principle 6: Make processes, stateless, and store the data outside the Web application

Leading web development practices recommend the storage of persistent data in separate services. It can be any relational database, for example, like Redis, Amazon S3, and so on.
However, if you’re working with Docker, you don’t have to store all the data inside the container. This is because your app has to be stateless.
Going forward, this approach will be critical to scalability. If you need authorization in your API, you can use stateless JSON Web Tokens, or you can use sessions, but store them in Redis.
The Symfony framework can work both ways, and such techniques enable scalability benefits. For example, you can run one container or hundreds of containers that use the same code and work with the same services.
You can restart your cluster (or a bunch of containers) or run a new one with a new version-without data loss.
At some point during the growth cycle, you’ll need more than one server. At this juncture, the software will start running on several servers using a load balancer.
It’s the best approach to orchestrate the execution of functions and various requests. This is the exact moment when all the processes have to be stateless.
The users will be authorized on one server, but their requests will be pointed to another server to be executed. Unless the authorization service is stateless (and can support both servers), the user won’t be able to continue running the app due to lack of authorization on the second server.

Principle 7: Keep software self-contained and export services via port binding

All web apps have to be made available without dependencies. If an app uses several services, each service has to be made available via separate ports.
Once you run Docker Compose on the developer’s local machine, for example, the application will become available on http://localhost:8085. At the same time, a separate GUI for Database management services will be available on http://localhost:8084.
Such an approach allows us to run many Docker containers and use load balancers (like HAProxy and Amazon Elastic Load Balancing.)
If the development team refuse to follow this approach, it’ll make the launch process more complicated. All the unnecessary (extra) steps may create additional bugs in the system.

Principle 8: Apply the process model with NO sharing

As the web application is developed, there will be a variety of processes running within the app. However, it’s important to keep all these processes separate. You can even divide these processes into separate ones if some of them are getting “too heavy” to manage.
So nothing has to be shared between several different processes. It’s the best way to keep the application simple and stable. What’s great about this approach to web application architecture is the fact that it makes it easy to scale.

BELOW, YOU’LL FIND THESE RECOMMENDATIONS ILLUSTRATED WITH A PHP DEVELOPED MULTI-TENANT APPLICATION:

  • The app can run as many PHP containers as needed to scale (up or down).
  • It can work for as many clients as needed.
  • If we need to handle more HTTP requests, we can just add more running PHP containers.
  • If we need to handle more background tasks, we can add more containers with background workers to handle these needs.
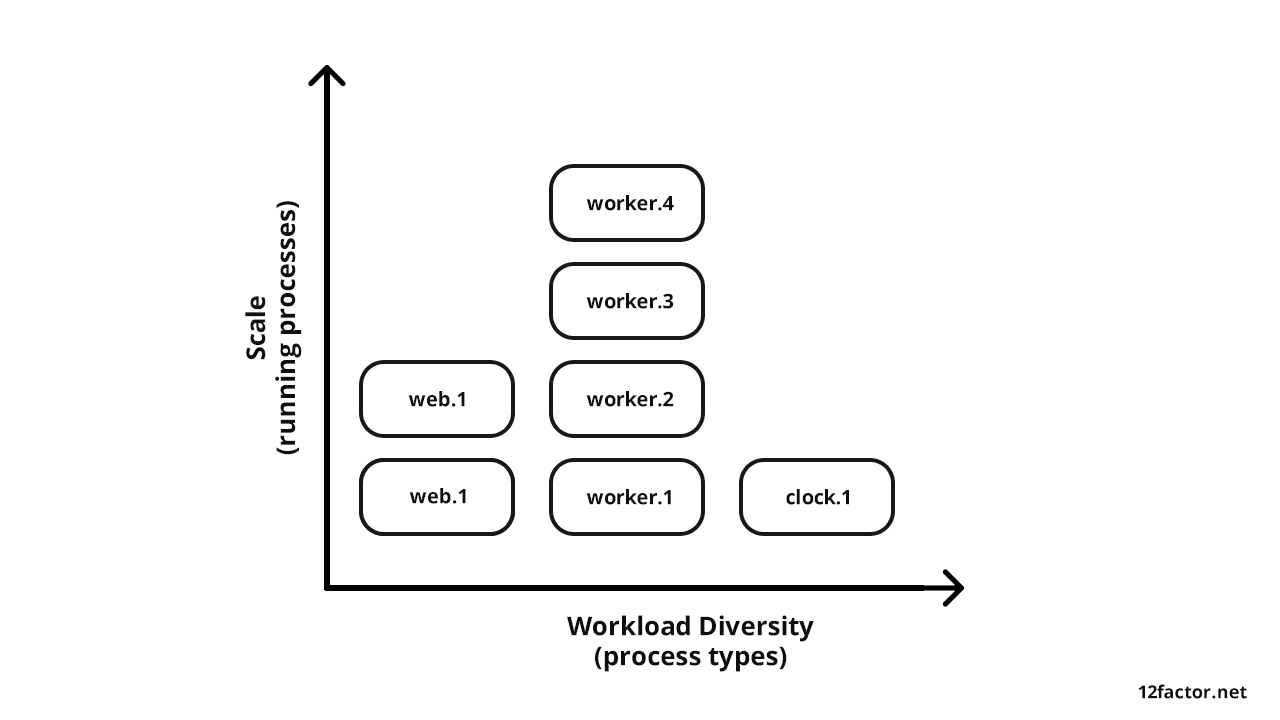
Multi-tenant web application processes architecture

Principle 9: Stay sustainable with fast launching and shutting down processes

All web applications have to be developed in a manner that enables scaling (up or down) at will. It should be able to run 100 containers, for example, during business hours (when the app users are most active), and run ten containers at night (to save money allocated for the infrastructure).
This approach can be applied to your software product by containing the processes, separately. However, you have to enable them to be launched or terminated rapidly.
That’s why minimization of the launch time for processes is a must. If you use Docker, you can run more PHP containers.
The container image should be ready for launch. Don’t compile at startup, and don’t run PHP Composer during the launch. The time to launch should always be as short as possible.
When you want to scale down, all you have to do is shut down some containers. It’s also critical to shut down the containers without disrupting the system.
Users don’t want to see request timeout or error messages. So use proper termination signals by sending daemons, like in most queue servers.
RabbitMQ and Beanstalkd are great examples that work efficiently in the background and queue the job in case of failure. You should also apply transactions to the Relational Database.

Principle 10: Keep development, staging, and production stages as similar as possible

The development, staging, and production environments have to be as similar as possible. Following this rule will help web application development teams avoid situations like a production software failure (which often happens when the web app was developed under different conditions).
There are some cases where the developer can run an application on a local machine with Docker and use the same Docker containers for staging and production. To use something that works only in the cloud, it’s better to go with the Adapter pattern.
For example, the production Docker cluster uses the same containers that were tested on staging but with different environment variables. The PHP and PostgreSQL versions will be the same (and unchanged), but the latter will run on Amazon RDS.
Log level is different as the users don’t see details about errors like the ones seen on the developer’s machine or staging server. Anyway, we will still receive reports about errors (with error details) in our error log aggregator server. This way, you’ll know about the error before users report it.

Principle 11: Good practice collecting application logsis is to perceive them as event streams

Software engineers should approach logs as event streams and not a steady stream of data that’s headed for storage. It’s the optimal way to reach high-visibility while running an application.
Storing logs as separate files for each Docker container (or separate services) should not be an option for your team.
By default, the Symfony PHP app writes logs on to log files, but you can configure the logs output to Linux stdout/stderr stream. You can do this by setting “php://stderr” string in the log path.
After that, you will be able to see all active logs from the console. Anyway, such an approach will be good for development but not good enough for production. You can see the logs while your Docker container is running but not after the container has been terminated.
For production, I would highly recommend the use of log aggregator services. Sentry, Graylog, Logstash, or Splunk are excellent examples.
Such services can aggregate logs from all running containers and enable analysis from a centralized platform. You can also leverage notifications to be informed about production issues and avoid losing data logs after a crash.

Principle 12: Manage admin activities as one-off processes

Administration and management activities play an integral part in the development and deployment of software products.
Database migrations, operations with cache, creating new system users and backups are just some examples. All these web development principles have to be applied to those activities as well.
Symfony provides a bin/console command to handle admin/management tasks. It’s best to run such commands as a one-off process in the same identical environment as the regular long-running processes of the app. It means that we need to run a new container for just one task instead of using an existing container.
Here’s an example of how Symfony accomplishes database migrations in Docker:
Example of DB migration with Symfony and Docker
We use Docker run, not Docker execute. This command works with the container that’s already running. After the migrations are complete, the Docker container can be exited. This will be a one-off process.

Achieve web application stability and scalability

All the web application development principles mentioned above should act as a baseline for your software development team. Such implementations should also be made wisely and aligned with business priorities.
They should be technically reasonable and seamlessly applicable to specific use cases. If you choose to ignore one or more of these best practices, there should be an excellent reason for it.
The key to a successful web development project is to create a culture of CI. It matters because it’s becoming effortless to automate things like deployments, updates, and setting up infrastructure for new users. Check our Case study on creating Advisory Web Platform For Education & Mentoring with CI.

Conclusion

In conclusion, it’s critical to follow these steps and only divert from it when it’s absolutely necessary. When followed accordingly, these development principles ensure that your software is stable and ready to scale.
It has paid dividends time and again in my software development career and promises to do the same for you in your next web development project.

Monday, April 27, 2020

How to Plan a Minimum Viable Product: a Step-By-Step easy to follow Guide


For those just venturing into the world of mobile app development, MVP (minimum viable product) is a term you should familiarize yourself with fairly quickly. Not only will an MVP assist in validating your idea for a mobile product, but it will also provide direction towards which app features you should include to achieve success.

So what does all this mean? An MVP is all about testing your idea and discovering what will work to properly target your customer. This article serves as a step-by-step guide that will provide you with a basic understanding of how to plan a minimum viable product.

What is an MVP?
An MVP is a minimal form of your product that is tested on the market. This development strategy allows your team to validate (or invalidate) product assumptions and learn how your target users react and experience your product’s core functionality. This approach will provide insight into properly allocating your budget to satisfy your overall business objectives. Building an MVP is an iterative process designed to identify user pain points and determine the appropriate product functionality to address those needs over time.

In mobile app development, an MVP is a development method where you develop only the core functionalities to solve a specific problem and satisfy early adopters. Essentially, an MVP is the basic model of your product that will fulfill the primary goal you want to achieve.

MVP development follows a build-measure-learn process, which allows you to release a product that can be continually improved as you validate (or invalidate) assumptions, learn what users want, and build future iterations of your app that better serve your customers.

Why build an MVP?
The main goal of an MVP is to develop a working product that provides immediate value, quickly, while minimizing costs. Starting with an MVP will allow you to learn more about your end-user and the market you wish to enter as you test your assumptions. An MVP will also set the stage for future iterations of development and clarify the sequential steps to take in the project – whether that’s changing directions entirely, or continuing down your set development path. In some instances, an MVP can also be used to showcase business potential and win stakeholder buy-in. Whether you’re looking for support from internal or external investors, an MVP definitely strengthens your position, as it proves the merit of your product and secure funding for future development.

Below we outline the steps involved in creating an MVP and discuss in detail what occurs at each stage. 

The Step-by-Step Guide to Plan a Minimum Viable Product
This process is part of the agile MVP development framework we use at Clearbridge Mobile for our mobile app development projects. Following these steps will help you identify and prioritize features, as well as help you confidently outline what you need to get your MVP to market.  

Step 1: Identify and Understand your Business and Market Needs
The first step is to identify if there is a need for your product in the market. This can be an organizational need or a customer need that addresses a current gap. It is also important to analyze what your competitors are doing and establish how you can make your product stand out. This will help determine what kind of mobile product you need to be successful.

Long-Term Goals
Once you’ve determined there is a need for your product, it is important for you to set a long-term business goal: what are you planning to achieve? For example, if you are a coffee shop chain, you may have the long-term goal of reducing checkout time by 30 percent.

Success Criteria
Next, identify what will define the success of your product. Our coffee chain, for example, might define success by reaching that 30 percent time-to-checkout reduction, having 100,000 active monthly users, and reaching $1 million in monthly transactions via their app.

Step 2: Map Out User Journey(s)
It is important to design your mobile product with your users in mind. A good way to ensure that your users will have a good experience with the first iteration of your app is by mapping out user journeys. This will allow you to look at your product from the perspective of the user, beginning with opening the app to reaching an end goal, such as making a purchase. This provides insight into how you can design the app in a way that is convenient for users. In addition, defining user flow and addressing the actions users need to take in order to complete an end goal, ensures you don’t miss anything while keeping user satisfaction in mind.

Things to consider when creating a user journey:
  • Identify the user

Who will be using your product? It’s possible that you will have more than one category of users. For example, if you have a service appointment booking app, you may have the appointment scheduler (customer) and the service technician.
  • Identify the Actions (Jobs)

The jobs are the actions that the user or users need to take in order to reach the story ending and achieve the goal.  When planning your MVP, you will likely want to look at which user has the most jobs and focus on that user; however, there may be higher priorities that need to be addressed, so you may need to focus on a different user or even multiple users.
  • Identify the Story Endings

For each user, there will be a story ending, which is the goal for the user (i.e. booking an appointment).

Below is an example of how we would lay out a user journey:

Minimum Viable Product Template

Step 3: Create a pain and gain map

Once you’ve worked out the user flow you will want to create a pain and gain map for each action. The pain and gain map allows you to identify all user pain points and the gains the user achieves when each is addressed. This tactic lets you determine where you have the greatest potential to add value. You are then able to focus your MVP in these areas while adding the less impactful ones to your product roadmap for future releases.

We recommend organizing the pain and gain map into a chart. Here is what a pain and gain chart might look like for the Pet Adopter user.

Minimum Viable Product Template

Step 4: Decide What Features to Build
At this stage, you will be able to discern what features to include in your MVP, as well as what features to include on your product roadmap that are a lower priority. Below are some tools you can use to decide which features are necessary to make your MVP successful. Asking the question of what does my user want vs. what does my user need, can help Identify and prioritize features.  Keep in mind, implementing too many user-requested features too soon can harm the user experience and take away from the overall purpose of the product. The only features you should include should be connected to your product’s overall goal.

Opportunity Statements
Use opportunity statements to finalize what features you want to build out. At this stage in the MVP development process, you will want to create feature sentences. For our Pet Adopters that are applying to adopt animals, for example, the opportunity statement “How might we expedite the application process?” could become “Reduce application processing time by 10 percent.”

Breakdown Features to Include in Your Product Roadmap
List the user and the specific opportunity statements, and provide a breakdown of the features to include in the product roadmap.

Prioritization Matrix
This step helps you identify where you can make the most impact in relation to the urgency of the feature. Using a prioritization matrix, you can make the final decision on what absolutely needs to be included in your MVP, and what features can be included in later releases. Below is our recommended format for your MVP prioritization matrix.


Minimum Viable Product Template

At this point, you should have a strong foundation to plan a minimum viable product. You have identified and understand your business or customer needs; you have found the opportunity to address the pain points, and have decided what features to build and their priority. Now, you can focus on getting your MVP to market.

After Your MVP
After Launching your MVP it is imperative that you collect feedback from your users. Users tell us where the product is lacking and ensures market validation. This will help you generate new ideas grounded in user behavior research which will shape the subsequent versions of your product. It is important to continue to test, learn and measure, and then test again until the product is finalized.

Thursday, April 23, 2020

25 Tips For Improving Your Software Development Process


How do you keep improving as a software engineer? Some pieces of advice are valid no matter your experience level, but often the advice will depend on where you are in your career.
If you're a beginner, the best advice is to simply learn your language, frameworks, and tools top to bottom and gain more experience with a variety of different projects.
If you're an experienced developer or working in a software development company UK or anywhere around the globe, than you should constantly try to find new ways to optimize your code for readability, performance, and maintainability, and then practice making well-reasoned decisions about where to focus time and resources in your code—whether it's testing, performance optimization, or other technical debt.
Those are some of the themes you’ll find if you ask veteran software engineers to share their best advice for being a great programmer. There aren’t any well-kept secrets. The advice of many of the most successful developers is readily available to you on blogs and forums.
I’ve taken the most illustrative advice and recurring tips from blogs and forums and organized them into five categories that emerged as I compiled them. I've paraphrased and merged various similar tips into single snippets, and I've also left a few pieces of advice as untouched quotes from their authors.
Whether you have five, ten, or twenty years of experience programming—or if you have almost no experience—I think just about every developer will find some good ideas for self-improvement.

Domains, architecture, and design

1. The best programmers can take a complex problem, break it down into smaller pieces, solve each of those pieces, and then put everything back together to solve the initial problem.
2.  Software is just a tool for solving domain problems. Since it’s needed in almost all domains, develop in one that interests you. If you understand a domain well and are passionate about it, you’ll be a much better, more motivated developer. You’ll also be exponentially more valuable and lucrative to companies hiring in your chosen domain.
3.  Don’t let one domain pigeonhole you into one way of coding. An example would be a mobile developer who is mainly good at hooking together existing APIs but can't come up with a sane data representation. Don’t be a one-trick pony.
4.  Plan your code away from the computer. It will help you build a clear mental model before you start. You use the same strategy in writing, because if you don’t have an outline, your content becomes a messy stream of consciousness.
5.  As an architect, you can’t have blind spots in your understanding of your applications and their execution environments. You need to know how things work in the front end (UI), the back end, the data store, the OS, any virtualization layers, the hardware, the network, and the data center.

Languages, tools, and advancing from beginner to intermediate

6.  Contribute to open-source projects as a bridge from beginner to intermediate. Collaborate with the developers of the project and attend meetups to collaborate with other developers in person.
7.  Don’t let anything get in the way of that initial motivation to learn programming and just build something. Sometimes you block yourself by having too much focus on reading books or resources first. Other times beginners will try to find the perfect first language. Your first language doesn’t matter. What matters is learning to program well. Just start coding.
8.  Learn multiple programming paradigms such as object-oriented programming, functional programming, reflective programming, etc. Believe it or not, your programming in one paradigm will improve after studying an alternative paradigm.
9.  Make common programs that have been made before. Not for a production project (see “reinventing the wheel”), but as a learning project. If other developers can make a calculator, text editor, paint, Tetris, or Pong, then so can you. Look at several examples of these apps written by more experienced developers and try to learn their tricks.
10.  Beginners learn just enough of their tools to get by. To become an intermediate or expert developer, you need to know your tools cold. Learn all of the features, menus, and context menus. Learn to use them without a mouse by memorizing keyboard shortcuts. Find every “tips and tricks” article available.

Code readability and maintainability

11.  Name variables so that other developers can understand your code better. This is a skill you need to nurture.
12.  Using inheritance often reduces testability and reusability of your object-oriented code in the long run. Your first choice should be using composition and interfaces.
13.  Don’t use design patterns like a hammer looking for a nail. If you don’t have a clear reason you need it, don’t use it.
14.  Always favor shallow code hierarchies to deep-nested code (whether it’s inside or outside a function). Deep-nested code is harder to maintain, harder to reuse, and more likely to create bugs.
15.  Reusable code is helpful and important, but trying to write overgeneralized, super flexible code is often a waste of time. This kind of code is usually harder to maintain and causes bugs. It’s okay to hardcode some things if your code is doing one task.

Technical debt, code coverage, and process

16.  Know when to take on technical debt and when to pay it off so it doesn’t compound. When exploring (and discarding) different features and pivoting frequently, borrow heavily on technical debt. When your position is stable and your direction is clearer, optimize your remaining features and clean up bugs to pay off that technical debt before moving on to the next stage.
17.  Within the context of your projects, learn what the right amount of testing is. Too little and your software becomes unreliable and everyone is afraid to deploy to production. Too much and you’ll end up wasting too much time and resources writing and maintaining them, while also making the development process slower.
18.  Commit your code in small, working chunks and write a detailed commit messages that will help developers find and understand bugs that may have been introduced in that commit. Just summarize what you did and why you did it.
19.  Most developers don’t think about security in every unit of code they write. Many think that frameworks will handle that for them. Don’t be like most developers.
20.  You can spend an exponentially greater amount of time hunting down the last 1% of bugs in a project than you would for the first 90%. If you’re not working in a domain that requires your software to work perfectly 99.999% of the time, then you should spend less time debugging the edge cases and features people probably won’t use.

Soft skills and productivity

21. Have large chunks of time set aside for focused coding each day. The quantity of time spent coding is meaningless if it’s full of interruptions such as meetings, emails, and web browsing.
22.  Don’t be ashamed to admit when you don’t know something. As a developer, you’re often solving new problems, so you can’t be expected to know all the solutions immediately. Trying to hide your lack of knowledge only slows the learning process.
23.  Don’t be afraid to share your unfinished work with others frequently.
24.  Googling is a crucial developer skill. Learning how to do something you haven’t done before and finding optimal solutions from the collective intelligence of the developer community is half the battle in programming.
25.  Teach. Even if you’re a novice at programming, you’re knowledgeable about something. Teaching teaches the teacher. And if you can train other workers, your manager should realize that you’re exponentially more valuable.

Finally

Take a look at some of these and then maybe pick some of your favorite pieces of advice from this article to create a tentative checklist for your personal growth. Share some of your own advice in the comments below or tell us about some advice here that you really liked or disliked. Hopefully we'll all get the jobs we want with this advice.

Tuesday, April 21, 2020

How to Create a Mobile App Startup


The mobile app market is growing and bringing more revenue, but it’s still quite a venture to start a mobile app business. Data from CB Insights shows that only about 30 percent of startups succeed. To ensure the success of your mobile app startup, we’ve prepared some useful tips.

#1 Find a problem to solve 

Mobile app startups often concentrate on an idea only, forgetting about crucial factors that lead to its success. But an idea alone might not be enough to hit the market. You should create an app specifically to provide value to your target audience, which you can only do by thoroughly planning the UI/UX and content. During the planning stage, ask yourself the following questions:

What problem does the mobile app startup solve?

If you take a look at the statistics of failed mobile app startups, you’ll see that the majority of them had an idea but didn’t solve a problem. As long as your startup has no aim and no solution to a user’s pain points, it’s not likely to succeed. To stay afloat, you need to offer a solution to a common (and long-lasting) problem.

Does anyone actually want this app? 

There’s no point in making an app if there’s no market for it. Even the most outstanding idea will fail if you don’t know your target audience. With more than 5.5 billion apps available in the leading app stores, it seems impossible to create something unique. However, there’s still a chance to achieve success. Define your potential users and predict their needs, what they like, and what they’re afraid of. 
Your task is to highlight the use of your app whenever they ask themselves, What do I get out of it? It’s not that easy to make users download your app, let alone like it. To increase the user retention rate, let your users see the benefits of the app right from the start.

#2 Choose the platform

When you have a limited budget and need to check if your idea is going to be profitable, you tend to look for the cheapest way to create an app. However, the price is not the only parameter you should take into consideration. Users’ loyalty to an operating system plays one of the most important roles. While choosing a platform for your app, you’ll inevitably face the Android vs iOS dilemma. Don’t follow your heart; rather, follow the market metrics and potential profit.

Target your users

Looking at the market, it’s obvious that there are more Android users worldwide (around 76 percent of all mobile phone users). This isn’t surprising due to the wide variety of Android smartphone manufacturers. However, when creating a mobile app startup, you should consider the location of your target audience and the local preferences. In the graphic below, you can see the dominant operating systems in different regions. If your target audience is in a region where users are loyal to one operating system, your choice is clear.
mobile app users
If your business model includes paid features, keep in mind that iOS users are more willing to buy apps and make in-app purchases.

Programming languages

Another crucial factor is how hard it is to develop your app, which influences the cost and speed of development as well as the features you can implement. 
Android and iOS each support more than one programming language, and you should think of the ability to switch languages if you change the team or technology stack. For instance, iOS apps are developed in Objective-C and Swift, while Android apps use Kotlin and Java. These Android languages work well together, so you can combine them without any halt in development. However, the same is not true with iOS. Carefully choosing between the languages will help you switch between them much faster in the future when you scale and upgrade your app.

Time and cost

The cost of iOS and Android app development UK and around the world is approximately the same. The only thing that differs at this point is the testing time. Because of the great number of Android smartphones with different specifications, it takes much longer to check the compatibility of an Android app with devices. Compare 18 iOS devices with relatively the same configurations with hundreds of Android smartphones with a multitude of configurations. It’s a big scope of work for the QA specialist, which leads to increased production costs. 

#3 Raise funds

There are various ways to get financing and various funding platforms to choose from. Your task is to weigh the pros and cons to choose the best method of financing. Below, you’ll find top sources of startup funding.

Angel or seed funding

The most preferred option for any startup is an angel investor who’s ready to provide enough capital in exchange for a high rate of return or equity. Angel investors are typically family and friends, prosperous business people, or groups of individuals united by one goal. Seed funding from an angel investor always comes at the start of a promising startup. To put it simply, an investor acquires part of the startup in exchange for money this startup will hopefully make later.
All in all, getting an angel investor is the safest way to get financing for your business in comparison to bank loans and unstable crowdfunding. You don’t have to return the money in case of failure, so there’ll be no debt. Moreover, angel investors are often savvy in terms of conducting business; therefore, they can provide you some guidance. 
Common problems with angel investors include lack of involvement (investors are too busy with side projects), the itch for gain (investors expect fast growth), slow funding, reduced founder control, and unclear roles of the founder and angel investor.
You can search for potential investors on AngelList, Funded.com, and Angel Investment Network.

Bootstrapping

Bootstrapping is starting a business without relying on external funding. If you already have some capital to start your small business, you’ll enjoy sole ownership. Unlike with an angel investor, in this case you’re the one with the equity. What’s more, nobody will interfere with your control over the direction of your mobile app startup. No external investor will change the focus of business development. 
On the flip side, the CEO bears the personal risk of failing and losing everything invested. Additionally, bootstrapping usually means limited resources, which leads to slow growth.
There are big chances that you can succeed with such an approach, provided you’re focused on your strategy, stick to the budget, and scale carefully.

Bank loans

Taking a loan from a bank may be the first thing that springs to mind when you think about finding funds for your startup. One of the key points is that banks provide some of the lowest interest rates for loans. 
However, it’s a challenge to get a bank loan, as you need to provide business credit scores and reports, personal guarantees, collateral, etc. Banks need strong proof that you’re likely to repay them, which is never clear with mobile app startups. 
If you’re ready to put in the time and effort to prove that your business is going to bring a healthy cash flow, this option is for you.

Crowdfunding

The most popular funding method among startup CEOs is crowdfunding. There are a number of trusted platforms where one can share their idea and get funding from a big pool of investors. The advantage of this fundraising strategy is that your idea reaches people worldwide. This increases the chances of getting the money you need in a short time. In addition to raising funds, crowdfunding allows you to validate your idea and see if it’s going to be a success. 
The most popular crowdfunding platforms are Kickstarter, Indiegogo, and GoFundMe.

#4 Prepare a perfect pitch deck

To attract potential investors, an engaging pitch deck is a must. Your pitch deck must give the essence of your startup, your development plan, and your promotional strategy. 
You may have heard of the elevator pitch: it’s your perfect middle ground to strive for. This tactic assumes a short, informative presentation that can describe your product in 30 seconds, which is the length of an average elevator ride. Try to grab attention with the first two sentences, use simple language, don’t complicate your presentation with statistics, and stick to the point.
pitch for investors

#5 Build an MVP to test your idea 

Building a minimum viable product (MVP) is essential to the success of your startup. An MVP has proved to be the go-to solution for mobile app startups, as it contains only crucial features. Launching an MVP will help you figure out whether your target audience is really interested in your app, allow you to get feedback on possible improvements, and help you validate the concept before you start making a complete app with further iterations. Other benefits you get with an MVP include:
  • An affordable core product
  • User feedback 
  • Quick market launch
  • Product ready for presentation to possible investors
A lot of top companies launched an MVP before the final app was born. Let’s take a look at the story of Instagram, which became a success in a few months. First, there was an HTML5 prototype called Burbn. Even though the name doesn’t reflect the app idea, Kevin Systrom, the creator, named the app Burbn because he likes whiskey and bourbon. The app featured photo sharing, check-ins, and planned posts. Photo sharing was the most popular component of the app.
After Systrom raised $500,000, Kevin put together a team and focused on developing the photo sharing aspect of the prototype. Having researched the market and their direct competitor, Hipstamatic, they decided to blend photo filters with social elements. So they pivoted to leave only photo editing, posting, liking, and commenting. In eight weeks, there was the Instagram beta. 
Thanks to a well-timed pivot and beta testing, Instagram managed to find their unique offer, fix emerging bugs, and launch a unique product. On the launch day, Instagram became the top free photo editing app on the App Store. In ten weeks, there were one million Instagram users. In a year, Facebook bought the company of twelve employees for $1 billion. Even nine years later, we still have a minimalist app with one core feature. 
The lesson to learn from this story is that you can launch a successful product in two months if you act fast and make it simple and easy to use.
Among other companies who started with MVPs you can find Uber, Dropbox, Airbnb, Facebook, Spotify, and Pinterest. Thanks to their MVPs, these companies fixed issues with their apps, got fresh ideas, and evolved into the perfect products we now enjoy.

#6 Promotion

After you’ve made an MVP, you need to deliver it to your target audience as soon as possible. There are different channels for advertising and promoting your app. The promotion strategy you choose can have a big influence on your app’s success. Some of the most popular ways to publicize your app are:

Social media marketing

Entrepreneurs use social networks to increase brand awareness and engagement, generate leads, get customer support, etc. There are a lot of social networking sites, so how can you find the perfect match and reach your goals? We’ve chosen the top five social networks:

Facebook

Facebook is a must for any startup. However, B2C startups are likely to get more from this network. If your startup is a social network, photo or video editing, ecommerce, travel, beauty, or fashion app, pay extra attention to strengthening user engagement and connections. Whatever startup you have, effective interaction with users will add value to your product. For instance, RunKeeper, a fitness app, promotes its brand on Facebook by posting entertaining sports trivia and photos of runners in branded gear.

Instagram

Instagram is a pure B2C platform that gives unlimited opportunities to startups in the travel, fashion, health, arts, food, ecommerce, beauty, and photography industries. Also, if your target audience is young women or Millennials, Instagram is a must. Moreover, it shares the same ad platform with Facebook. To make your Instagram account more comfortable to use, switch to the business profile, where you’ll find analytics on engagement, likes, audience, etc. 
Visit the Instagram page of Intercom, a customer messaging platform, to see how they interact with their followers on a daily basis. Intercom actively uses the Instagram questions feature, posting answers in Stories. According to MediaKix, Instagram stories and posts are the most efficient content promotion tools and will stay the focal point of many advertising strategies.

LinkedIn

LinkedIn is an irreplaceable (and the most business-centered) platform for B2B startups. Companies in the finance, employment, legal, IT, science, and technology sectors are more than welcome to use LinkedIn. As it’s business only, B2B promotion looks organic in this environment. A startup that resolves the pain points of businesspeople is sure to reach its target users and generate qualified leads on LinkedIn. According to HubSpot findings, LinkedIn generates the highest conversion rate at 2.74%, three times higher than Twitter and Facebook combined.
Amazon keeps its product news updated and engages followers in conversations by posting photos from science fairs and posting short bios of their outstanding workers. My first 100 days in Amazon posts are especially popular among followers.

YouTube

This is a perfect network for visual content and can greatly contribute to your brand. Another advantage of YouTube is that it has access to the Google Ad platform. YouTube videos are a good way to promote B2B companies and startups that are visually driven. It’s a great choice for ecommerce, as users feel more confident after watching product videos. 
YouTube has become a valuable platform for Canva, a free design tool. Canva posts workshops on how to use their product and shows off the amazing results their users achieve. 

Twitter

Communication and information businesses use Twitter to generate content and promote themselves. It’s more of a B2C platform, which is why so many customers refer to Twitter accounts if they have issues with a product. Twitter can be a fast and convenient addition to your customer service. Industries that can benefit from Twitter include retail, ecommerce, travel, and sports.
Chanty, an AI-powered team chat, grew their number of Twitter followers organically. Posting behind-the-scenes tweets, using hashtags, and prompting replies helped Chanty gather an active community around the product.

Influencers

The best advertising is a recommendation based on personal experience from an opinion leader or trendsetter. Research by Twitter shows that nearly 40 percent of users have bought a product because of a recommendation from an influencer. The reason for that is the native type of advertisement influencers offer and the level of trust they already have. 
If you’re looking for an influencer, contact:
  • Celebrities
  • Industry experts
  • Popular bloggers
  • Micro-influencers 
All of these people have reputations and a lot of followers who can become your potential users. Moreover, there’s payment flexibility. Even micro-influencers with 2,000 to 10,000 followers can offer a loyal audience with high engagement. 
To resonate with your target audience, choose the right social network. Which is right directly depends on your niche and target audience. We recommend working with influencers on the social platform you already use. Thus, it’s a good idea for B2B startups, such as SaaS and consulting services, to collaborate with LinkedIn industry experts for relevant and valuable leads. Fashion, ecommerce, beauty, and lifestyle startups can attract thousands of users by working with Instagram and YouTube influencers. Messengers and information-driven startups will resonate among the followers of Twitter influencers. 
For a successful influencer promotion, follow these tips:
  • Address niche influencers in your sphere
  • Create unique promotional materials
  • Prioritize platforms
  • Set clear goals and expectations, e.g. to increase engagement or expand reach
  • Add individual hashtags to monitor and measure the success of ad campaigns
  • Provide influencers with clear guidelines of how to promote your brand

ASO

App store optimization (ASO) is SEO for applications. ASO makes it easier for users to find your app. With the help of ASO, you can improve your app ranking on the Google Play Store and the App Store. ASO increases app exposure and user engagement. By investing in ASO, you ensure that your app won’t get lost at the bottom of lists.
Pay extra attention to the features below when listing your app startup:
  • App name, URL, and subtitle. All these attributes must reflect the idea of your app and include the main keywords that refer to your app. 
  • Keywords. This is the crucial attribute in terms of optimizing your app in search results. Research keywords in user search queries and fill in this field thoroughly.
  • Ratings and reviews. Ratings and reviews are not only a deciding factor for the majority of users but a ranking signal for app stores. The number of reviews, recent votes, and positive ratings matters. Motivate your users to leave regular reviews, and don’t forget to reply to them.

Over to you

Creating a mobile app startup is easy. Creating a successful mobile app startup is a challenge.